We’re back in Surrey where our very own Construction Director George talks you through our progress and goes deeper into how we do the job we do.
Hopefully the insights you find helpful into how the whole process works.
We’re covering everything from concrete to waterproofing to shuttering and steel fixing and more.
Any suggestions of stuff you’d like to see drop us a comment!
Chapter timelines below:
03:21 Reinforcement & Shuttering
07:22 Backfilling & Reinstatement
08:54 Waterproofing
We’ll be back very soon with more progress on this incredible project!
#basementconstruction #construction #basementconversion #basement #underpinning #waterproofing #excavation #luxury #luxurylifestyle #luxurygarage.
[Published: 30 Jun 2025]
Transcript
Guys, welcome back. This is our uh Guys, welcome back. This is our uh Surrey Super Basement.
Another little Surrey Super Basement. Another little catchup video that we're making for you catchup video that we're making for you down here. Um if you've watched some of the videos Um if you've watched some of the videos before, you'll probably recognize the before, you'll probably recognize the area.
If you don't, this is where we area.If you don't, this is where we took the previous video talking about took the previous video talking about our four different phases of works. Um our four different phases of works. Um things have progressed a little bit things have progressed a little bit since you were since you were last here since you were since you were last here with us.
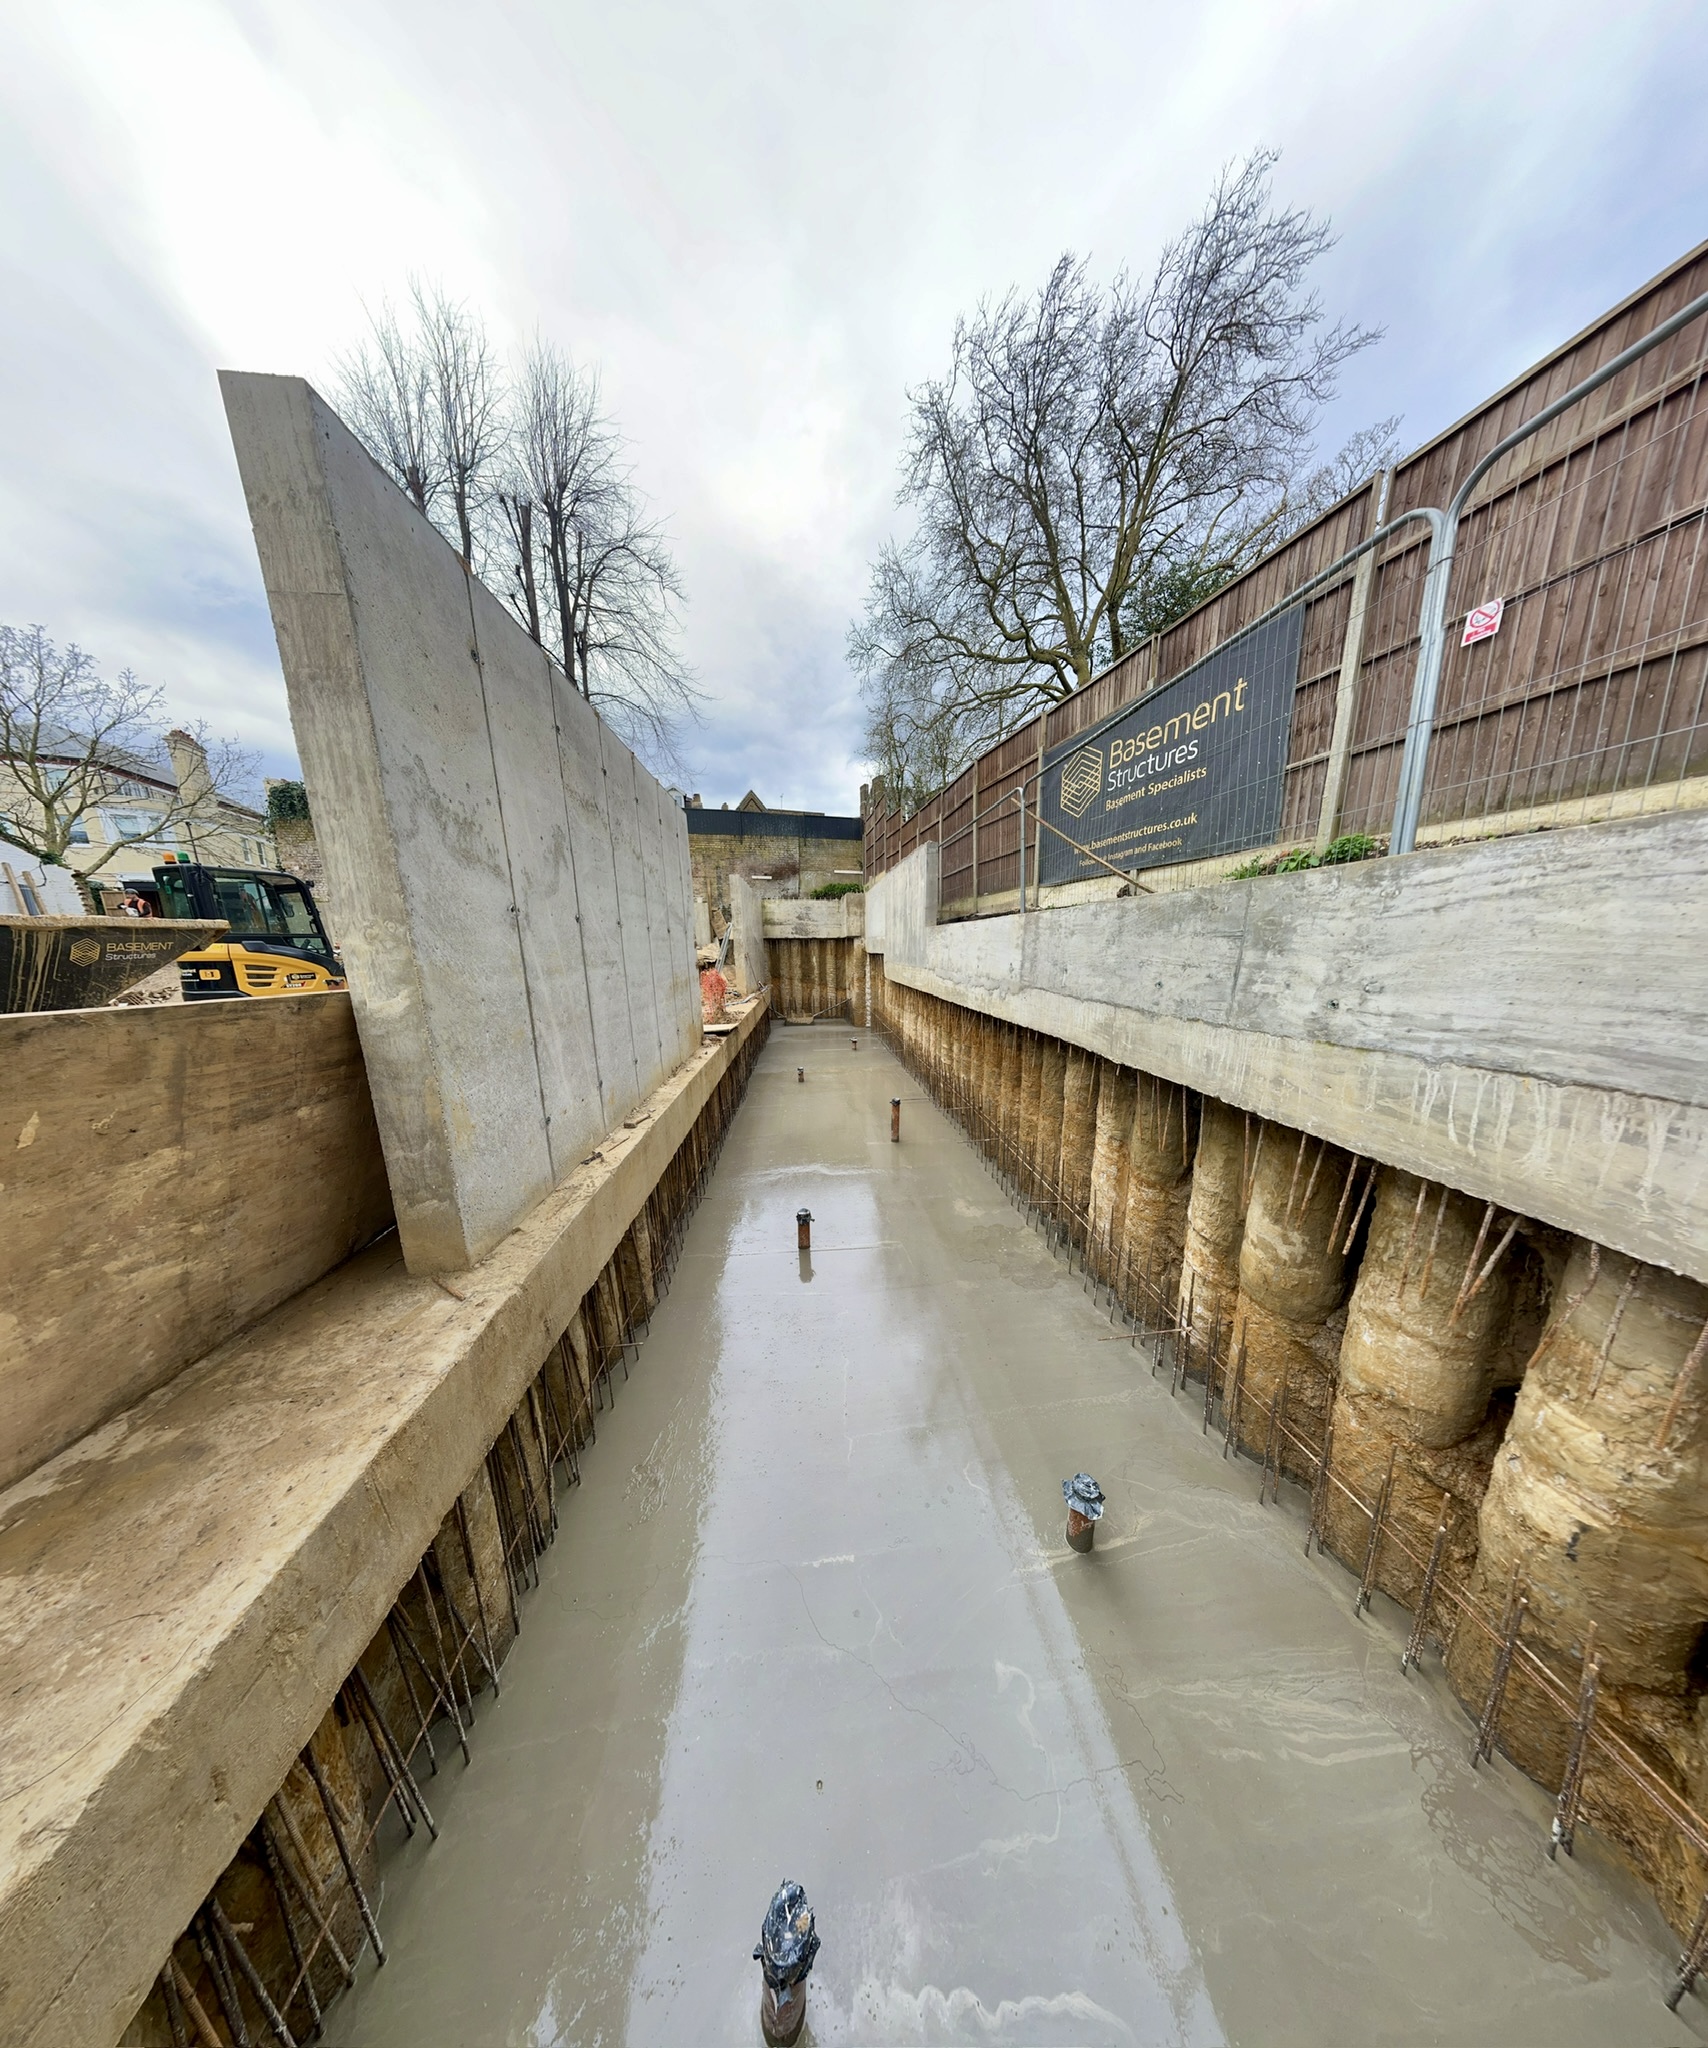
So when I was here before, we with us. So when I was here before, we had the reinforcement in for the um for had the reinforcement in for the um for the toe for the retaining wall. We've the toe for the retaining wall.We've obviously, as you can see, we've since obviously, as you can see, we've since poured that.
And we've also got some poured that. And we've also got some lovely wall sections poured as well. So lovely wall sections poured as well.
So once the toe was bored, you can see we once the toe was bored, you can see we had the bars that were sticking up from had the bars that were sticking up from the from the foundation slab there that the from the foundation slab there that we then connected our reinforcement to we then connected our reinforcement to here. This creates our cage for our here.This creates our cage for our walls. And then as you can see, we put walls.
And then as you can see, we put our uh our panel system in place and our uh our panel system in place and pour you a lovely straight wall for our pour you a lovely straight wall for our basement. Um bars at the top there are basement. Um bars at the top there are ready for our connection.
So as I'm ready for our connection.So as I'm standing at you now here, this will be standing at you now here, this will be the roof of our basement going through the roof of our basement going through there and then moving up towards where there and then moving up towards where you'll sort of filming now with a you'll sort of filming now with a camera. Our ramp will then lead up out camera. Our ramp will then lead up out onto the road to the client's um onto the road to the client's um driveway entrance.
So he'll be able to driveway entrance. So he'll be able to drive in from his gateway into the drive in from his gateway into the basement and then the vehicles will basement and then the vehicles will drive under here. uh and then he'll be drive under here.uh and then he'll be able to park and do what he needs to do.
able to park and do what he needs to do. We're also looking at connection between We're also looking at connection between the garage basement which is here and the garage basement which is here and the main property. We'll show you some the main property.
We'll show you some of that on a on a video coming up a bit of that on a on a video coming up a bit later on as we progress through onto later on as we progress through onto that stage. You can also see the guys at that stage.You can also see the guys at the top with the excavator. We're uh the top with the excavator.
We're uh doing a little bit of muck management doing a little bit of muck management here. So, we're creating ourselves a here. So, we're creating ourselves a platform.
We're reinstating some of the platform.We're reinstating some of the ground here. So when we come to do the ground here. So when we come to do the works behind the wall, we're able to um works behind the wall, we're able to um just park the excavator onto the just park the excavator onto the material that's due to be removed and material that's due to be removed and pass that straight over the top of the pass that straight over the top of the wall to where it'll be um compacted and wall to where it'll be um compacted and back filled, which will then fill the back filled, which will then fill the void that we've got behind the retaining void that we've got behind the retaining wall there.
Couple of little fun bits wall there. Couple of little fun bits that we had down here, all this lovely that we had down here, all this lovely sunny weather that we seem to be making sunny weather that we seem to be making these videos in. And it was typically these videos in.And it was typically the day that we came to uh to pour the the day that we came to uh to pour the wall foundation.
A couple of days before wall foundation. A couple of days before that, we were forecast quite a lot of that, we were forecast quite a lot of heavy rain. And the waterproofing detail heavy rain.
And the waterproofing detail that we use at the toe of the wall there that we use at the toe of the wall there is a seeker water bar. So that is very is a seeker water bar.So that is very reactive to to moisture and to rain and reactive to to moisture and to rain and things like that. So once we've laid things like that.
So once we've laid that, we have to be sure that we get that, we have to be sure that we get that either covered with concrete or that either covered with concrete or protected in a different way. Um so the protected in a different way. Um so the reaction per uh the reaction process, reaction per uh the reaction process, sorry, then starts and then it swells up sorry, then starts and then it swells up and works within the concrete and not and works within the concrete and not before that.
And obviously the rain before that.And obviously the rain falling didn't help that at all. We had falling didn't help that at all. We had to rally the troops a little bit, get a to rally the troops a little bit, get a bit of rush around, organize pumps and bit of rush around, organize pumps and concrete mixes to get down here so we concrete mixes to get down here so we could pour this wall section so it could pour this wall section so it wasn't affected by the rain.
Again, just wasn't affected by the rain. Again, just have to be a bit dynamic with everything have to be a bit dynamic with everything and how you work with things just to and how you work with things just to make sure that you're ahead of the make sure that you're ahead of the weather. good bit of sort of weather.good bit of sort of pre-planning to make sure that you've pre-planning to make sure that you've got all that going on in the background got all that going on in the background so you don't compromise the quality of so you don't compromise the quality of the work and you you make sure that the work and you you make sure that everything that we're installing is as everything that we're installing is as per the manufacturer's guidance and um per the manufacturer's guidance and um and as per the manufacturers's and as per the manufacturers's recommendation installation and things recommendation installation and things like that.
So yeah, this is us down in like that. So yeah, this is us down in the in the basement corner. We'll have a the in the basement corner.
We'll have a little walk around and we'll have little walk around and we'll have another little video over the other another little video over the other side. You'll see some of the panel side.You'll see some of the panel system that we've used for here that system that we've used for here that gives us a lovely clean, good quality gives us a lovely clean, good quality wall edge. Uh, and we'll talk you wall edge.
Uh, and we'll talk you through some of the reinforcement over through some of the reinforcement over the far side. So, you've seen the walls. Let me show So, you've seen the walls.
Let me show you how we uh build the formwork that we you how we uh build the formwork that we were discussing earlier and uh and then were discussing earlier and uh and then how we get it square, lined, and leveled how we get it square, lined, and leveled and make sure that we're pouring the and make sure that we're pouring the correct width wall and so on and so correct width wall and so on and so forth. So, we set out using our GPS. So, forth.So, we set out using our GPS.
So, we mark our corner positions and then we we mark our corner positions and then we use a good oldfashioned string line. So, use a good oldfashioned string line. So, we can then pull a straight line through we can then pull a straight line through that.
You can see on the floor here, that.You can see on the floor here, look, we've got our line sprayed look, we've got our line sprayed through. You can just make out there, through. You can just make out there, that is our um outside edge of our that is our um outside edge of our formwork shutter there.
So, that gives formwork shutter there. So, that gives us our straight line to work through on us our straight line to work through on the base. We then install these little the base.We then install these little pegs, these little pins here, so we can pegs, these little pins here, so we can push our shutter tight up against those push our shutter tight up against those pegs, and that means that it won't move pegs, and that means that it won't move any further then.
So, we're guaranteed any further then. So, we're guaranteed our width on our base of the shutter our width on our base of the shutter there. So within that as well, you might there.
So within that as well, you might be able to make out we have these be able to make out we have these concrete spacers. This allows for our concrete spacers.This allows for our concrete cover. You can just see them in concrete cover.
You can just see them in there. So that makes sure that we have there. So that makes sure that we have the correct amount of concrete cover the correct amount of concrete cover around our reinforcement, but it all around our reinforcement, but it all helps and acts as part of the the helps and acts as part of the the straightening up process of the cage and straightening up process of the cage and the formwork.
So these are our formwork the formwork.So these are our formwork panels. Um they're a proprietary system panels. Um they're a proprietary system and they come as they are like this.
and they come as they are like this. They have a very sort of very quick and They have a very sort of very quick and fast system of putting them together. As fast system of putting them together.As you can see down here, look, we have our you can see down here, look, we have our quick clamps.
Our quick clamps are used quick clamps. Our quick clamps are used to connect each panel together. Um, to connect each panel together.
Um, we'll do another little snippet, another we'll do another little snippet, another little video showing you the pushpull little video showing you the pushpull props which we use for level control. props which we use for level control.But ultimately, it's a rinse repeat But ultimately, it's a rinse repeat process. So, the panels are stood up, process.
So, the panels are stood up, quick clamp together. We have our cage quick clamp together. We have our cage on the inside.
We have our spacer at the on the inside.We have our spacer at the bottom and our pin, our dowel that stops bottom and our pin, our dowel that stops it from moving. And then we put an it from moving. And then we put an angled strut on here, which is called a angled strut on here, which is called a pushpull prop.
It has adjustment on it pushpull prop. It has adjustment on it which will allow us to move this shutter which will allow us to move this shutter inwards and outwards depending on where inwards and outwards depending on where we need to be to level the shutter we need to be to level the shutter through. So again, little idea of what through.So again, little idea of what we see on the inside.
We'll make another we see on the inside. We'll make another quick video um showing you the pushpull quick video um showing you the pushpull systems and how to adjust that systems and how to adjust that shuttering to uh to make sure we get the shuttering to uh to make sure we get the lovely straight wall that you've seen lovely straight wall that you've seen that we've already poured over the other that we've already poured over the other side. So we're down in one of the uh side.
So we're down in one of the uh potential rooms of the uh of the super potential rooms of the uh of the super basement that we're doing in Surrey. Um, basement that we're doing in Surrey.Um, this is actually an outside sort of this is actually an outside sort of storage area as as part of the garden storage area as as part of the garden feature. So, there'll be a doorway feature.
So, there'll be a doorway coming through here. But, while we were coming through here. But, while we were in here, I thought it'd be a really good in here, I thought it'd be a really good time to talk about some reinforcement.
time to talk about some reinforcement.You can see it everywhere that the work You can see it everywhere that the work that we carry out, there's this stuff that we carry out, there's this stuff kicking around everywhere. So, contrary kicking around everywhere. So, contrary to popular belief, there is a bit of to popular belief, there is a bit of science behind it.
So, we follow uh a science behind it. So, we follow uh a design that's given to us by the uh design that's given to us by the uh structural engineer. We have a structural engineer.We have a barbending schedule which we'll talk barbending schedule which we'll talk about in a bit more detail in another about in a bit more detail in another video because that's more of a sort of video because that's more of a sort of an offices sort of based chat really.
Um an offices sort of based chat really. Um but ultimately what we look for in what but ultimately what we look for in what we look out for is each one of the bars we look out for is each one of the bars that you can see here. Each has a that you can see here.
Each has a number. Each number has a particular number.Each number has a particular place within the reinforcement cage. So place within the reinforcement cage.
So we have the 16 mil bars here that will we have the 16 mil bars here that will be labeled as 16 mil lacer bars that run be labeled as 16 mil lacer bars that run through from top to bottom. And then we through from top to bottom. And then we have our 10 mil bars that run have our 10 mil bars that run horizontally through the job.
So each horizontally through the job.So each one of these has a particular number. We one of these has a particular number. We make sure that these are put in the make sure that these are put in the correct place.
They have a particular correct place. They have a particular spacing. On this occasion, it's 200 mil, spacing.On this occasion, it's 200 mil, which is approximately that there.
So, which is approximately that there. So, we have a 200 by 200 square that runs we have a 200 by 200 square that runs through and that creates our our through and that creates our our reinforcement for our walls. In the reinforcement for our walls.
In the corners as well, you can see we have our corners as well, you can see we have our Lbar details. So, the Lars again, they Lbar details.So, the Lars again, they have their own corresponding bar mark. have their own corresponding bar mark.
So, we make sure that the correct L's So, we make sure that the correct L's are tied in in the correct space. are tied in in the correct space. General rule for reinforcement.
Our over General rule for reinforcement.Our over connection here, our splice detail, as a connection here, our splice detail, as a general rule, like I say, we use 40 general rule, like I say, we use 40 times the diameter of the bar. So, a bar times the diameter of the bar. So, a bar with 10 mil would have a 400 mil splice with 10 mil would have a 400 mil splice connection.
And that works again in connection. And that works again in reinforcement unless it's stated reinforcement unless it's stated differently by the structural engineer differently by the structural engineer obviously across the board. Again, obviously across the board.Again, little touch on these.
These are our little touch on these. These are our concrete spacers. This just guarantees concrete spacers.
This just guarantees our correct concrete cover. So when we our correct concrete cover.So when we wrap all this in the gray stuff, we make wrap all this in the gray stuff, we make sure that this reinforcement is the sure that this reinforcement is the correct distance away from the outside correct distance away from the outside of the wall. And that's a little touch of the wall.
And that's a little touch on reinforcement. Sorry, just have a little run through Sorry, just have a little run through back filling and reinstatement. Uh back filling and reinstatement.
Uh again, just trying to save the client a again, just trying to save the client a bit of money, trying to be a little bit bit of money, trying to be a little bit clever about things if we can. Little clever about things if we can.Little bit of soil management that you can see bit of soil management that you can see going on behind me there. So, what we're going on behind me there.
So, what we're actually doing is the area that's being actually doing is the area that's being excavated in the middle, we're going to excavated in the middle, we're going to utilize that material, pass it over the utilize that material, pass it over the top of the wall, and then we're going to top of the wall, and then we're going to use that to back fill the the uh the use that to back fill the the uh the back of the retaining wall there. So, back of the retaining wall there. So, this means that we haven't got to use a this means that we haven't got to use a dumper.
We haven't got to trail material dumper.We haven't got to trail material again from the other side of the job all again from the other side of the job all the way down here. Save ourselves an the way down here. Save ourselves an excavator because only one machine can excavator because only one machine can do the work, whereas we would need two do the work, whereas we would need two if we were leading the material in with if we were leading the material in with the dumpers.
One to load it obviously to the dumpers. One to load it obviously to move it over and then one to level it. move it over and then one to level it.So, it's just a really handy little tip.
So, it's just a really handy little tip. You know, we just have a little think You know, we just have a little think about what we're doing before we go into about what we're doing before we go into into actually doing it. Looking at how into actually doing it.
Looking at how we can manage the the most sort of we can manage the the most sort of efficient and economical way of uh of efficient and economical way of uh of working any sort of job out on the on working any sort of job out on the on the project down here. So, this this the project down here.So, this this material here, once we have our drain in material here, once we have our drain in behind, we remove our uh our plastic behind, we remove our uh our plastic which is protecting the ground from which is protecting the ground from stoving in if we get any weather or stoving in if we get any weather or anything like that. We can then start anything like that.
We can then start digging down to formation level on the digging down to formation level on the inside of the basement. We then move the inside of the basement. We then move the material to the other side, level it material to the other side, level it through, and then we use a ramax, which through, and then we use a ramax, which is a compacting piece of equipment to to is a compacting piece of equipment to to back fill and ram and reinstate, sorry, back fill and ram and reinstate, sorry, and compact the material behind the and compact the material behind the retaining wall.
So then that will free retaining wall.So then that will free the open space up in the middle and at the open space up in the middle and at the same time, we'll be back filling the same time, we'll be back filling behind the walls. behind the walls. So here we are behind the wall of our uh So here we are behind the wall of our uh our super basement just to have a little our super basement just to have a little chat about some waterproofing details chat about some waterproofing details because you know water migration is a because you know water migration is a big thing for all the work that we do.
big thing for all the work that we do. We like to keep it on the outside and We like to keep it on the outside and not on the inside. So uh so this is a not on the inside.So uh so this is a really good job actually.
The client has really good job actually. The client has gone belt and braces with this one. So gone belt and braces with this one.
So we're using lots of different techniques we're using lots of different techniques and lots of different options. Initially and lots of different options.Initially you can see the wall. So the wall we've you can see the wall.
So the wall we've poured with a waterproof concrete. So an poured with a waterproof concrete. So an additive has been added into the additive has been added into the concrete as it's being mixed and then concrete as it's being mixed and then poured into the wall sections itself and poured into the wall sections itself and that fills the capillaries within the that fills the capillaries within the concrete wall itself.
So that stops any concrete wall itself.So that stops any water from being able to migrate through water from being able to migrate through this slab here and into the internal this slab here and into the internal side of the building. So that's one step side of the building. So that's one step that the client has chosen to go for.
that the client has chosen to go for. That is obviously monitored and tested. That is obviously monitored and tested.We do cube results and everything else We do cube results and everything else like that will then prove that the like that will then prove that the correct additive has been added into the correct additive has been added into the concrete and we'll begin a warranty and concrete and we'll begin a warranty and guarantee with that from the guarantee with that from the manufacturer.
So as part of the walls manufacturer. So as part of the walls being um constructed, you can see these being um constructed, you can see these sections here. So each one of these sections here.
So each one of these sections represents a a bay. So these sections represents a a bay.So these bays were formwork panels which you'll bays were formwork panels which you'll see over the other side and you might see over the other side and you might have seen in some of the videos already. have seen in some of the videos already.
These formwork paddles are clamped These formwork paddles are clamped together with something called a divvy together with something called a divvy bar. So that is like a threaded bar that bar. So that is like a threaded bar that goes on either side of the wall and it's goes on either side of the wall and it's tightened up to create that space.
That tightened up to create that space.That space there replicated in the wall here. space there replicated in the wall here. These leave these little holes that we These leave these little holes that we have going all the way through the wall.
have going all the way through the wall. So, as a result of that, we need to fill So, as a result of that, we need to fill those as well because otherwise we'll those as well because otherwise we'll get water that will migrate through get water that will migrate through there. So, on this particular system, there.So, on this particular system, we're using a Seeker plug.
So, it's a we're using a Seeker plug. So, it's a rubber grommet that's supplied by rubber grommet that's supplied by Seeker, which are a really good Seeker, which are a really good waterproofing um manufacturer. Um that waterproofing um manufacturer.
Um that will then be installed within these will then be installed within these divvy bars here within the Divvy sleeve. divvy bars here within the Divvy sleeve.So where the bar went through, we have a So where the bar went through, we have a rubber sleeve, sorry, a plastic sleeve rubber sleeve, sorry, a plastic sleeve with a rubber grommet on the outside with a rubber grommet on the outside that's then tightened up in there and that's then tightened up in there and that stops any water from migrating that stops any water from migrating through the divies and into the inside through the divies and into the inside of the um inside of the basement there. of the um inside of the basement there.
Um in addition to that, I talked earlier Um in addition to that, I talked earlier about a water bar in here and having to about a water bar in here and having to protect it um from the weather. So protect it um from the weather. So within the concrete pore, we have uh a within the concrete pore, we have uh a strip of water bar that runs right the strip of water bar that runs right the way through the connection joint of the way through the connection joint of the slab and the wall.
So that is a very slab and the wall.So that is a very weak point for for any basement weak point for for any basement construction or any concrete structure. construction or any concrete structure. The weak area is always where one The weak area is always where one concrete slab meets another.
So the concrete slab meets another. So the water bar has been installed in there water bar has been installed in there again as per manufacturer's again as per manufacturer's recommendations. And we have a rep that recommendations.And we have a rep that pops out, checks our work as well, and pops out, checks our work as well, and everything is evidently signed off when everything is evidently signed off when we finished.
So that water bar is we finished. So that water bar is installed, the concrete's poured over installed, the concrete's poured over that and creates a gasket between the that and creates a gasket between the slab and the wall. So beyond that as slab and the wall.
So beyond that as well to be absolutely doubly triply well to be absolutely doubly triply quadruply sure uh the client has asked quadruply sure uh the client has asked us to put a protective membrane on the us to put a protective membrane on the outside of this on the outer corner outside of this on the outer corner where the slab here meets the wall where the slab here meets the wall there. So we use a system which is from there.So we use a system which is from Vandex. It's a cementous paste that we Vandex.
It's a cementous paste that we will put on the outer perimeter here will put on the outer perimeter here just as another little bit of just as another little bit of precaution. You can see it's not really precaution. You can see it's not really prepped up, but the process will mean prepped up, but the process will mean we'll clean everything through, get we'll clean everything through, get everything jet washed back, make everything jet washed back, make everything clean and tidy, and then we everything clean and tidy, and then we install the Vandex paste on there as per install the Vandex paste on there as per the manufacturer's guidance.
That again the manufacturer's guidance.That again is just absolutely belt and braces is just absolutely belt and braces waterproofing. In an ideal world, that's waterproofing. In an ideal world, that's exactly how you'd want your basement to exactly how you'd want your basement to be waterproofed.
be waterproofed.