Back to check progress at our Surrey Super Basement, George talks through in detail the progress we have made and the next steps in the build.
We’re talking entrance to basement, car considerations, drainage, break out gardens, steels, temporary roof supports, swimming pools and more.
00:33 Ramp & Swept path analysis
01:47 Drainage
03:35 Underpins, Props and steel beams
04:23 Frame system and Concrete roof installation
07:22 Underpinning
07:50 Different soil types
09:59 Breakout entrance into garden
10:58 Swimming pool and spa
Drop us a comment if there’s anything you’d like to see more of or understand on the build or basements in general, always happy to help!.
[Published: 25 Aug 2025]
Transcript
So, welcome back everybody. We're back So, welcome back everybody. We're back here at our super basement in Surrey.
here at our super basement in Surrey. Um, a little bit of an update video just Um, a little bit of an update video just to show you uh where we've got to and to show you uh where we've got to and how works are progressing. how works are progressing.
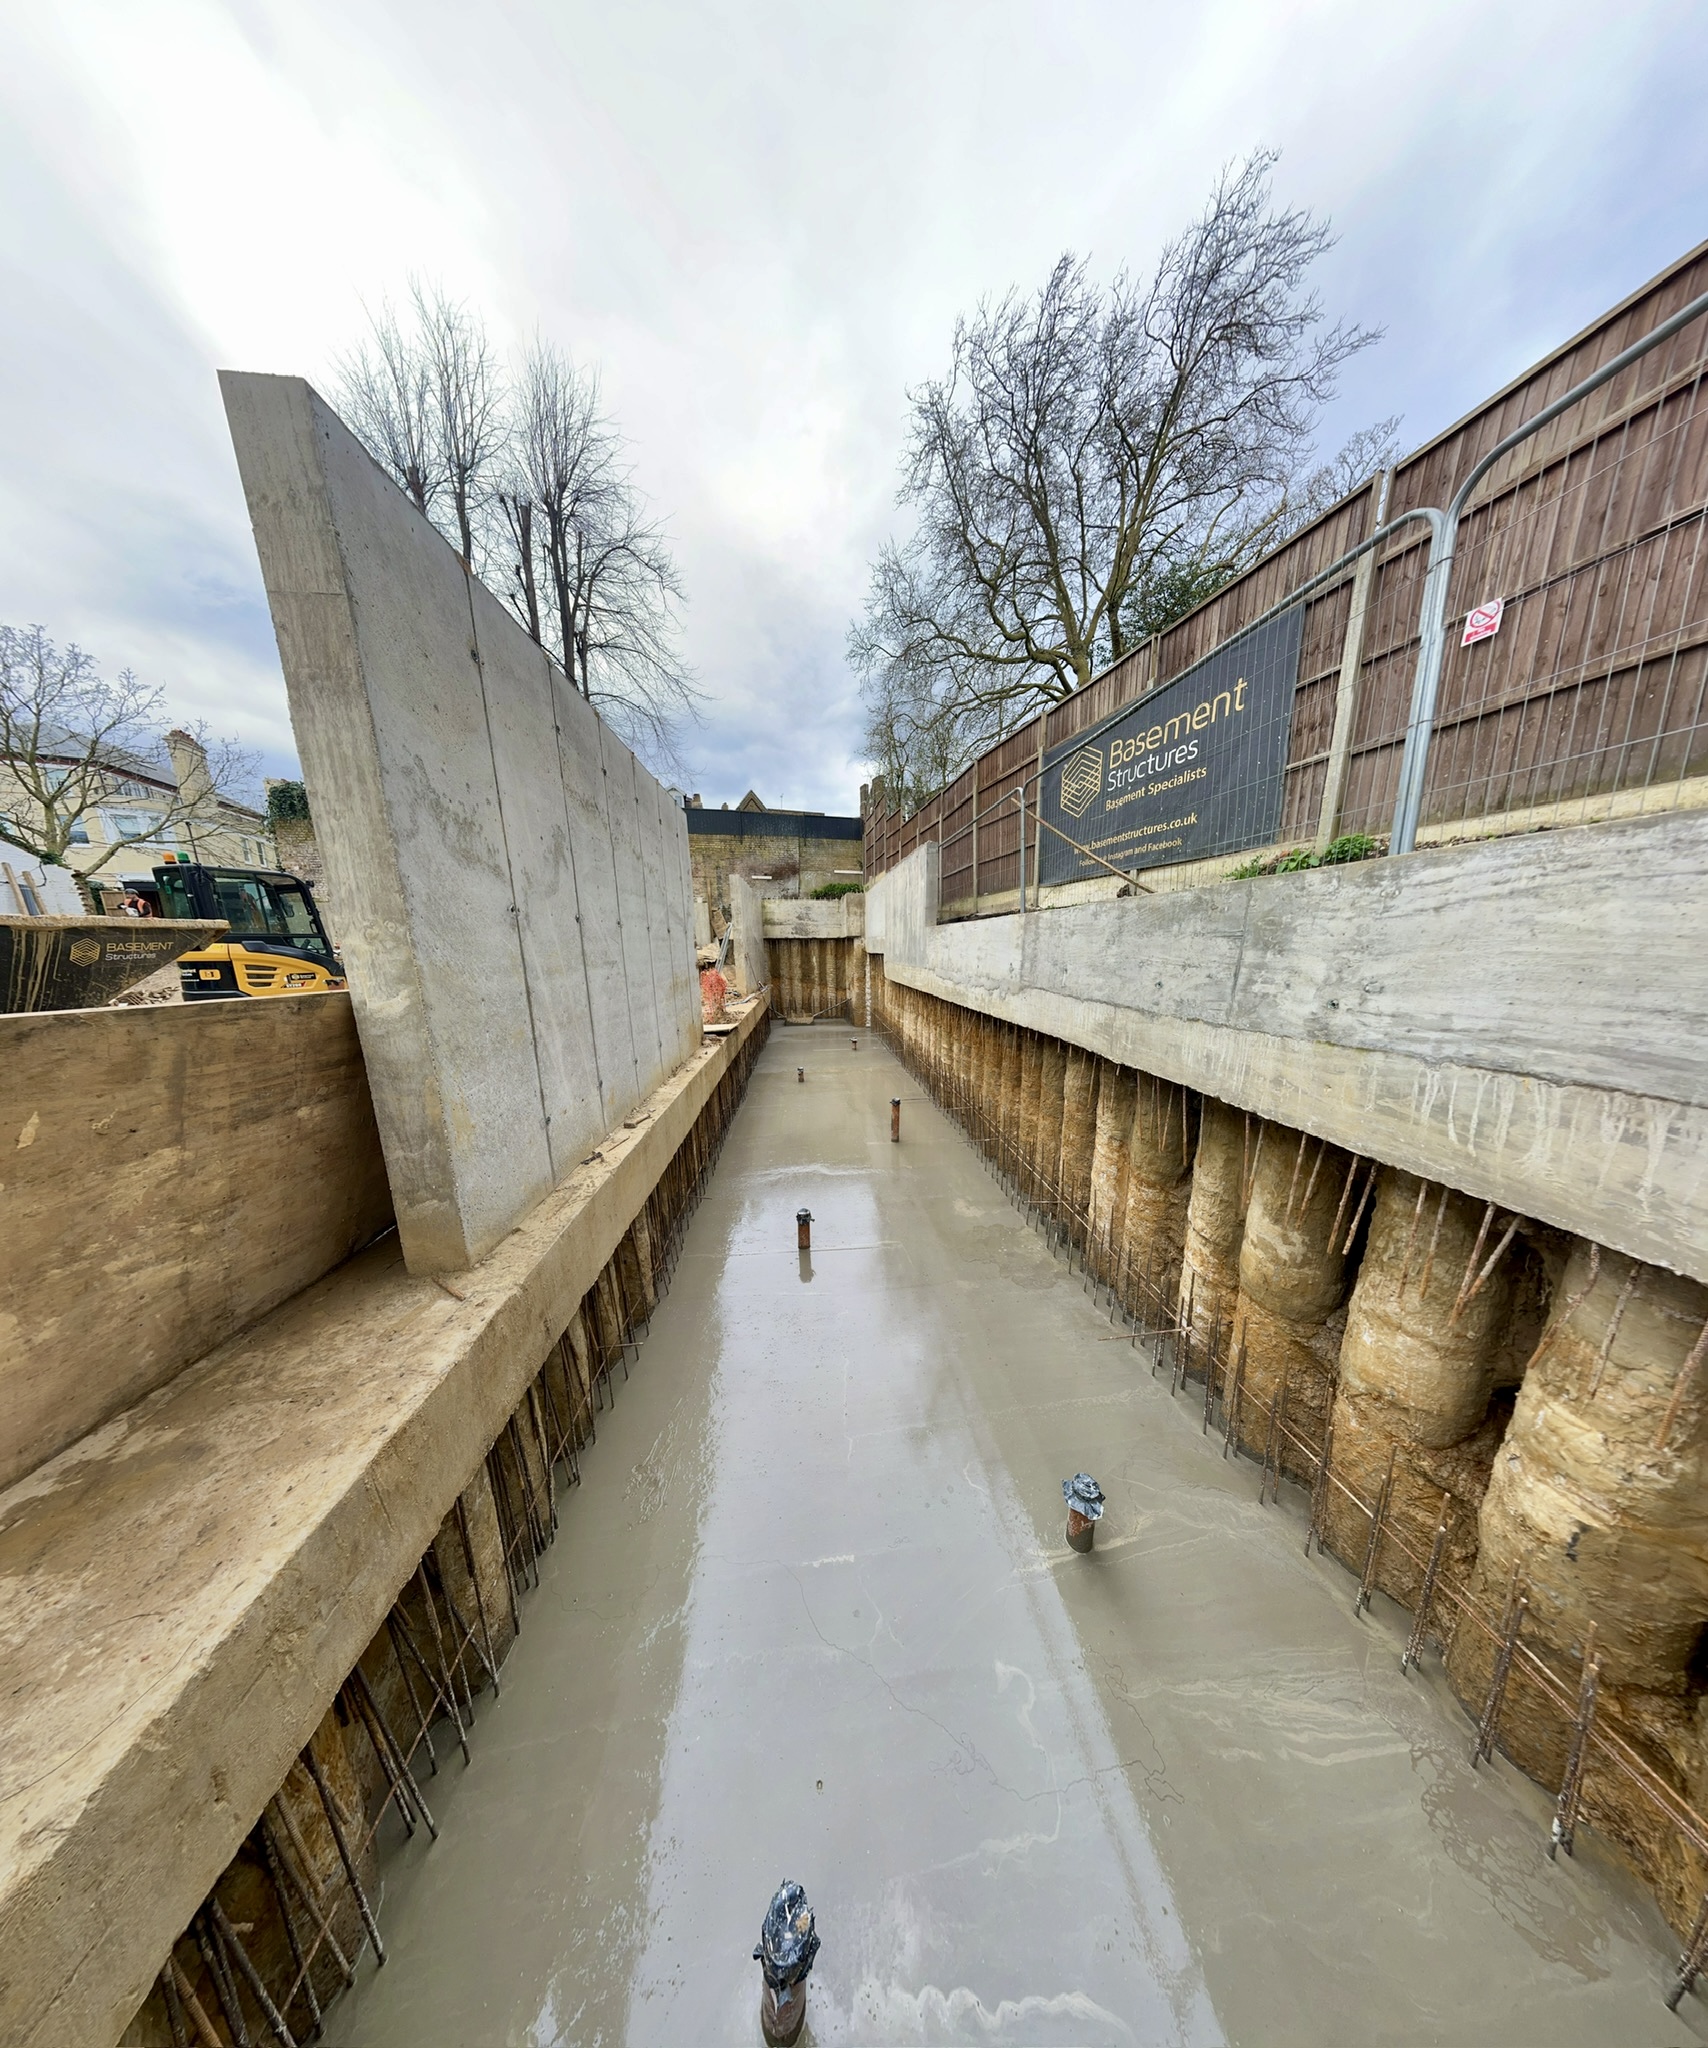
So, here we are at the bottom of the uh So, here we are at the bottom of the uh the main access to the basement. Um, it the main access to the basement. Um, it doesn't look like it now, but this will doesn't look like it now, but this will be our access ramp.
So, same procedure be our access ramp. So, same procedure again as we will. We'll have RC walls again as we will.We'll have RC walls with an RC slab that will follow us a with an RC slab that will follow us a nice steady gradient up to the top to nice steady gradient up to the top to the main entrance of the client's the main entrance of the client's property.
Couple of things that we've property. Couple of things that we've had to consider while we were down here. had to consider while we were down here.
Obviously, we need to cater for, you Obviously, we need to cater for, you know, anything from a four-wheel drive know, anything from a four-wheel drive from a transit van right the way up to, from a transit van right the way up to, you know, your lowprofile super supercar you know, your lowprofile super supercar sort of vehicles. Um, making sure that sort of vehicles.Um, making sure that nothing grounds out, nothing bottoms nothing grounds out, nothing bottoms out. So, we have a sweat path analysis out.
So, we have a sweat path analysis that's been taken place by one of the that's been taken place by one of the structural engineers and the architects. structural engineers and the architects. They design the gradients, so it'll be a They design the gradients, so it'll be a nice steep ramp down that will level off nice steep ramp down that will level off towards the entrance here.
So, none of towards the entrance here.So, none of these vehicles will bottom out or scrape these vehicles will bottom out or scrape the bottoms of the underside of the cars the bottoms of the underside of the cars as they go into the car park. seems as they go into the car park. seems silly to think about, but it saves a lot silly to think about, but it saves a lot of embarrassment a bit later on when the of embarrassment a bit later on when the client wants to bring his very expensive client wants to bring his very expensive car into his own car park and obviously car into his own car park and obviously can't get it in because the gradient for can't get it in because the gradient for the ramp isn't right.
So again, proper the ramp isn't right. So again, proper planning beforehand means that all these planning beforehand means that all these things are taken care of before we come things are taken care of before we come to site and start building at it. So to site and start building at it.So we've got a nice wide entrance here.
You we've got a nice wide entrance here. You can see the reinforcement that's closing can see the reinforcement that's closing out that will be closed off that will out that will be closed off that will give us the entrance into the garage. Um give us the entrance into the garage.
Um off the side of that you can see down off the side of that you can see down here as well. While we're here, we'll here as well.While we're here, we'll have a little look. So we have our have a little look.
So we have our perimeter drainage. Um, that's a gravel perimeter drainage. Um, that's a gravel drain that's wrapped in a geoexile to drain that's wrapped in a geoexile to prevent all of these fine gravels from prevent all of these fine gravels from dropping into that.
That allows any dropping into that.That allows any standing water that was to hit our standing water that was to hit our boundary wall here to run down into boundary wall here to run down into that. A nice positive way to get rid of that. A nice positive way to get rid of any water out of the basement.
A little any water out of the basement. A little bit of work here as well. This is a bit of work here as well.This is a product from our friends at Vandex.
So, product from our friends at Vandex. So, that's a unimort treatment that we're that's a unimort treatment that we're putting on any of the walls. So, as part putting on any of the walls.
So, as part of our quality control, any areas of the of our quality control, any areas of the wall that we're not happy with when we wall that we're not happy with when we strip our shutters off as an extra layer strip our shutters off as an extra layer of protection, we just put this Vandex of protection, we just put this Vandex over here. It just guarantees that we've over here.It just guarantees that we've got that nice solid waterproof wall got that nice solid waterproof wall there. Another little detail while we're there.
Another little detail while we're in this corner here, this is our scab in this corner here, this is our scab wall end. So, any construction wall end. So, any construction connection that we have between connection that we have between concrete, we make sure we have a lovely concrete, we make sure we have a lovely rough edge there.
It just gives a nice rough edge there.It just gives a nice tight bond for the next layer of tight bond for the next layer of concrete that gets poured up against it. concrete that gets poured up against it. So, yeah.
So, as we walk through here, So, yeah. So, as we walk through here, this is our entrance in. So, as you'd this is our entrance in.So, as you'd imagine, the client will be bringing imagine, the client will be bringing their cars down into here.
And then we their cars down into here. And then we have adequate room around here for them have adequate room around here for them to be able to park in. Um, as part of to be able to park in.
Um, as part of this area here, we've got to make sure this area here, we've got to make sure we've got our drainage in. So, again, we've got our drainage in.So, again, any water that might run down the ramp any water that might run down the ramp and might end up into the basement needs and might end up into the basement needs somewhere to go. So, all of the drains somewhere to go.
So, all of the drains are installed out to the outfall areas are installed out to the outfall areas that are at the other end of the project that are at the other end of the project there. So, again, make sure these goes there. So, again, make sure these goes in before we pour the slab.
Little bit in before we pour the slab.Little bit of embarrassment there if you forget to of embarrassment there if you forget to put them in. Pour the slab and we're put them in. Pour the slab and we're like, "Ah, yeah, we need to get some like, "Ah, yeah, we need to get some drainage in there." a lot easier to do drainage in there." a lot easier to do it beforehand.
Seems obvious, but it beforehand. Seems obvious, but something again that needs to be something again that needs to be considered and thought about before the considered and thought about before the main foundation's poured. So, if we work main foundation's poured.So, if we work forward back here, you can see the guys, forward back here, you can see the guys, they're tying the walls for the internal they're tying the walls for the internal plant room.
So, again, same details as plant room. So, again, same details as we've gone through in our videos before. we've gone through in our videos before.
Reinforcement gets tied, formwork gets Reinforcement gets tied, formwork gets put in place. Um, and then they can be put in place.Um, and then they can be poured and that then creates our room poured and that then creates our room spaces. So off the side of that here, spaces.
So off the side of that here, you can probably see the main house you can probably see the main house itself is now being fully supported by itself is now being fully supported by our temporary and permanent works. So our temporary and permanent works. So the the underpins were installed.
We the the underpins were installed.We have our temporary props that are above have our temporary props that are above there that are holding the brick work up there that are holding the brick work up in the property. Extra timbers there in the property. Extra timbers there just as a precautionary measure because just as a precautionary measure because the brick work is quite old and quite the brick work is quite old and quite sort of volatile.
So we just make sure sort of volatile. So we just make sure that every area is covered. And then we that every area is covered.And then we have the steel beams that are going in have the steel beams that are going in place.
You can just see the level of dry place. You can just see the level of dry pack there in between the steel beams. pack there in between the steel beams.
So that dry pack is a sharp sand and So that dry pack is a sharp sand and cement mix rammed hard into the into the cement mix rammed hard into the into the cavity that's created between the steel cavity that's created between the steel and the existing building that cures and the existing building that cures that goes nice and hard. It doesn't that goes nice and hard.It doesn't shrink and it makes sure that we don't shrink and it makes sure that we don't get any settlement on the property. So get any settlement on the property.
So this entire end elevation of the this entire end elevation of the property is now being supported either property is now being supported either by the concrete pins or by the steel by the concrete pins or by the steel beams that we've installed. So again beams that we've installed. So again working through here you probably see working through here you probably see the layout on the floor here.
So the the layout on the floor here.So the next phase of works once this is next phase of works once this is complete is we then install our concrete complete is we then install our concrete roof. So the concrete roof is supported roof. So the concrete roof is supported by a frame system.
The frame system is by a frame system. The frame system is supplied I'll show you a drawing over supplied I'll show you a drawing over the back in a minute. The frame system the back in a minute.The frame system supplied by um oars on this occasion.
We supplied by um oars on this occasion. We use them quite a lot. They provide a use them quite a lot.
They provide a design and a full specification for what design and a full specification for what we require to support the concrete roof we require to support the concrete roof when it gets installed. So as you can when it gets installed.So as you can imagine this is all marked out on the imagine this is all marked out on the floor here. These marking out all relate floor here.
These marking out all relate to the drawings that we have from them. to the drawings that we have from them. So these drawings here show us exactly So these drawings here show us exactly what we need to build and how we need to what we need to build and how we need to build it to make sure that the temporary build it to make sure that the temporary structure that's installed, excuse me, structure that's installed, excuse me, no rest for the wicked.
Um, but it shows no rest for the wicked.Um, but it shows us exactly what we have to install to us exactly what we have to install to make sure that the system down below is make sure that the system down below is adequate to support the concrete that we adequate to support the concrete that we will eventually pour above our heads will eventually pour above our heads here. Um, and then create the full car here. Um, and then create the full car park and the full basement area.
So you park and the full basement area. So you can see across the top there, we have can see across the top there, we have our reinforcement bars that are ready our reinforcement bars that are ready for our connection into that slab. So for our connection into that slab.So when you come back hopefully for your when you come back hopefully for your next video, you'll see that the slab next video, you'll see that the slab will actually be poured through the top will actually be poured through the top and then we could be standing up there and then we could be standing up there then looking down at, you know, the then looking down at, you know, the basement as it's created.
I have a basement as it's created. I have a little walk all around the back here and little walk all around the back here and we'll show you what's going on on the we'll show you what's going on on the other side of the building. So squeeze through here.
We're walking So squeeze through here. We're walking through the entrance of the plant room. through the entrance of the plant room.This is where the client will store all This is where the client will store all his pumps, all his me and equipment, his pumps, all his me and equipment, heaters, things like that.
Tucked out heaters, things like that. Tucked out the way of the building. Another section the way of the building.
Another section here. Look, same as the guys of before. here.Look, same as the guys of before.
So, all these walls and these So, all these walls and these connections were poured into the main connections were poured into the main wall that we had before, ready to pick wall that we had before, ready to pick up, continue into the main basement as up, continue into the main basement as the guys are doing behind us there. And the guys are doing behind us there. And then this will be the other closing wall then this will be the other closing wall of the plant room.
So, if I squeeze past of the plant room.So, if I squeeze past these steels, walking past our nice 3 m high RC walls, walking past our nice 3 m high RC walls, you probably, if you've seen a few of you probably, if you've seen a few of our videos before, you'll seen the video our videos before, you'll seen the video we did on the concrete blinding. Well, we did on the concrete blinding. Well, this was actually in this location here.
this was actually in this location here. So, under my feet, we have that layer of So, under my feet, we have that layer of blind that you would have seen the guys blind that you would have seen the guys install. That gives us our level install.That gives us our level control, which is then what we create control, which is then what we create our slab.
Then, we pour our walls. And our slab. Then, we pour our walls.
And then beyond the wall on the other side, then beyond the wall on the other side, which you'll probably see from a few of which you'll probably see from a few of the drone shots and things like that, the drone shots and things like that, we've actually backfilled that, we've actually backfilled that, reinstated all that area to make it nice reinstated all that area to make it nice and safe, make it secure. The internal and safe, make it secure.The internal stuff here that we see, this is all yet stuff here that we see, this is all yet to be excavated. So, as part of our to be excavated.
So, as part of our phasing works, as part of our temporary phasing works, as part of our temporary works design, once we have the works design, once we have the structures up around the perimeter and structures up around the perimeter and the back sections completed, then that the back sections completed, then that allows us to free this area up and start allows us to free this area up and start excavating under here. We'll have a walk excavating under here. We'll have a walk around the corner and we'll just show around the corner and we'll just show you what's going on with the with the you what's going on with the with the works to uh support the other side of works to uh support the other side of the property in a very similar fashion the property in a very similar fashion to the back.
So that will free this to the back.So that will free this ground up here for us to remove. We'll ground up here for us to remove. We'll have a quick walk round.
have a quick walk round. I can hear somebody shoveling. So I can hear somebody shoveling.So hopefully somebody's on with something.
He's there. So this is the phase coming out the way. Greg, let's talk him through it.
So this Greg, let's talk him through it.So this is the phase of the works that we um is the phase of the works that we um have picked off from the finished area have picked off from the finished area at the rear. I'll come down and have a at the rear. I'll come down and have a look because you can get the idea of how look because you can get the idea of how deep we are going.
So same principle deep we are going. So same principle again meter wide excavations only again meter wide excavations only opening up a small section of the opening up a small section of the foundation to make sure that uh we don't foundation to make sure that uh we don't dig any further than specified on the dig any further than specified on the structural engineers design part of the structural engineers design part of the temporary works meaning that we do these temporary works meaning that we do these drives in small sections so the rest of drives in small sections so the rest of the property is supported. You might the property is supported.You might look thinking, god, these are big deep look thinking, god, these are big deep holes here.
We've this ground here that holes here. We've this ground here that we're working in. We're very fortunate.
we're working in. We're very fortunate.So the ground itself is incredibly So the ground itself is incredibly strong, which gives us the option to dig strong, which gives us the option to dig in the way that we have. So we can shear in the way that we have.
So we can shear dig these excavations and these pins dig these excavations and these pins knowing that this ground is adequate to knowing that this ground is adequate to hold itself up. Obviously, if you're hold itself up. Obviously, if you're working in a clay area or a shale area, working in a clay area or a shale area, this would require a lot more temporary this would require a lot more temporary bracing and a lot more temporary bracing and a lot more temporary supports.
But knowing the the the supports.But knowing the the the location of where we are, the geoteex location of where we are, the geoteex geoteexile, excuse me, the geological geoteexile, excuse me, the geological reports that we've had proves that this reports that we've had proves that this ground can hold itself up to quite a ground can hold itself up to quite a substantial depth, which means we're substantial depth, which means we're allowed to work in this location the way allowed to work in this location the way that we are doing. So, back to the pin. that we are doing.
So, back to the pin. Greg's nearly finished the excavation. Greg's nearly finished the excavation.He'll clean everything up, neaten He'll clean everything up, neaten everything out, and then we'll dig down everything out, and then we'll dig down to formation level for the base.
So, we to formation level for the base. So, we cast the base in, which you'll have seen cast the base in, which you'll have seen from previous videos on the underpins. from previous videos on the underpins.
principles are all very much the same. principles are all very much the same.So the base goes in first and then that So the base goes in first and then that allows us a nice strong structure to allows us a nice strong structure to build the wall on. The wall can be build the wall on.
The wall can be poured and then it will be a dry pack poured and then it will be a dry pack detail at the top there to support the detail at the top there to support the building. So yeah, similar to a standard building. So yeah, similar to a standard underpin of we do on a normal basement, underpin of we do on a normal basement, but obviously you could imagine a lot but obviously you could imagine a lot lot deeper, you know, a little bit more lot deeper, you know, a little bit more thinking involved.
And we use our panel thinking involved.And we use our panel systems down here for the walls again systems down here for the walls again rather than the timber or apply product rather than the timber or apply product because the walls are so much higher. because the walls are so much higher. We're supporting so much more concrete.
We need a system in there that will be We need a system in there that will be able to deal with those sorts of forces. able to deal with those sorts of forces.But yeah, so we'll come out the But yeah, so we'll come out the underpin. We'll have a little walk underpin.
We'll have a little walk around. We'll show you the next pin around. We'll show you the next pin that's halfway through that's halfway through the works there.
the works there.So the middle pin here that we've got So the middle pin here that we've got the center pin, we've marked out. So the center pin, we've marked out. So there is a detail here where I'm there is a detail here where I'm standing at the moment is the entrance standing at the moment is the entrance to an external sort of washroom if you to an external sort of washroom if you like.
So there'll be a shower and a like. So there'll be a shower and a toilet in there for the client once we toilet in there for the client once we work here. The wall continues through work here.The wall continues through under the property which is marked out under the property which is marked out on the wall there already.
So the guys on the wall there already. So the guys have already dug this. We've put the have already dug this.
We've put the blind in. We've got our connection bars blind in.We've got our connection bars started here ready. So the next phase started here ready.
So the next phase for this is our reinforcement cage for for this is our reinforcement cage for the base. Working through pour our base the base. Working through pour our base small excavation under the building to small excavation under the building to undermine for our pin for our support undermine for our pin for our support for our underpin.
And then we can pull for our underpin.And then we can pull the wall section that will close out the wall section that will close out this this room here. As I've walked past this this room here. As I've walked past that I've obviously missed out here.
So that I've obviously missed out here. So this is our our breakout entrance if you this is our our breakout entrance if you like. So as part of the design of this like.So as part of the design of this product of of this particular basement, product of of this particular basement, the client wants a way to be able to the client wants a way to be able to walk straight out onto their garden.
So walk straight out onto their garden. So a lot of landscaping to happen yet out a lot of landscaping to happen yet out here obviously, but you sort of get the here obviously, but you sort of get the general gist of where we are. So we'll general gist of where we are.
So we'll work our way out of here. This will give work our way out of here.This will give the uh the client a nice patio area or the uh the client a nice patio area or if you want to pull out here at a later if you want to pull out here at a later date or something like that. You know, date or something like that.
You know, there's lots of scope here for for there's lots of scope here for for creating sort of what they want really creating sort of what they want really and how they want it. Nice little detail and how they want it. Nice little detail here again that we can see from our here again that we can see from our guys.
So the drainage we spoke about guys.So the drainage we spoke about around the corner there. You can see the around the corner there. You can see the other tail end of it here.
This other tail end of it here. This continues right the way around the continues right the way around the perimeter of the basement. As part of perimeter of the basement.As part of that again we have our our Vandex that again we have our our Vandex treatment on the external face.
Another treatment on the external face. Another little system that we talked about little system that we talked about previously protecting that connection previously protecting that connection between the wall and the slab. So we're between the wall and the slab.
So we're making doubly and triply sure here that making doubly and triply sure here that we're absolutely watertight when we come we're absolutely watertight when we come to close everything in. progress around to close everything in.progress around a little bit further to the last little a little bit further to the last little section that we can get to on this section that we can get to on this basement. The retaining walls here basement.
The retaining walls here completely finished around the full completely finished around the full perimeter. A little bit of back filling perimeter. A little bit of back filling and reinstatement next to the property and reinstatement next to the property because this will be some time before because this will be some time before we're there.
So, we don't want to risk we're there.So, we don't want to risk any movement in the ground. So, we just any movement in the ground. So, we just back fill that as a temporary measure.
back fill that as a temporary measure. Just adds a little bit of weight to the Just adds a little bit of weight to the inside of there and helps support the inside of there and helps support the property. This location that I'm property.This location that I'm standing in here now, this is actually standing in here now, this is actually the location of the swim spar.
So again, the location of the swim spar. So again, connection bars all sat there ready to connection bars all sat there ready to go for the additional concrete and go for the additional concrete and reinforcement to go in. And then we'll reinforcement to go in.
And then we'll be excavating deeper again down here to be excavating deeper again down here to install the spar and the pump system and install the spar and the pump system and everything else for the um for the everything else for the um for the client in here. I think it's a 6 m by 3 client in here.I think it's a 6 m by 3 m swim spar, but don't quote me on that m swim spar, but don't quote me on that exactly. Again, once we've done the exactly.
Again, once we've done the works down here, once we have our pins works down here, once we have our pins in, we can start installing our in, we can start installing our temporary steels, which will support off temporary steels, which will support off the walls here, support the whole rear the walls here, support the whole rear of the house. That's the next phase of of the house. That's the next phase of our temporary works.
And then we can our temporary works.And then we can start the main excavation, the really start the main excavation, the really exciting bit which will be going under exciting bit which will be going under the property itself. And then we'll see the property itself. And then we'll see hopefully in a video coming up the full hopefully in a video coming up the full parameter of the house.
From this end to parameter of the house. From this end to that, you'll be able to look right the that, you'll be able to look right the way through back into that car park way through back into that car park where we started out at the front. So, where we started out at the front.So, hope I haven't rambled on for too long, hope I haven't rambled on for too long, but this is a rough idea of where we are but this is a rough idea of where we are and what's going on.
Lots of things and what's going on. Lots of things happening at once. We'll make a lot of happening at once.
We'll make a lot of smaller videos and bits and bobs taking smaller videos and bits and bobs taking some details of all the little niggly some details of all the little niggly bits and try to explain to them as well. bits and try to explain to them as well.But yeah, thanks for bearing with me and But yeah, thanks for bearing with me and look forward to making the next video look forward to making the next video for you. for you.