Welcome to the official launch of our YouTube channel! In this very first episode, we’re kicking things off by taking you behind the scenes of a super basement build — from excavation to framing and everything in between.
At Basement Structures, we specialize in custom basement structures, and this video kicks off a full series showing our start-to-finish process. Whether you’re a homeowner planning a basement project or a construction enthusiast, you’ll love seeing how we turn a vision into reality.
In this episode:
• Site prep & excavation
• Foundation details
• Stockpiling
• Project goals and more
See how we’ve brought some value engineering that not only saves £100,000’s but also reduces the project lead time and lessens the impact of construction for the environment as well as the local area.
00:58 Value engineering
01:50 Saving £100,000’s
02:28 Retaining Wall
03:37 Initial Phases of Retaining Wall
05:31 Phase 1 Stepped Excavation
06:38 Stockpiling
08:23 What’s to Come
Subscribe and follow the journey as we create a high-performance basement built to last.
Don’t forget to like, comment, and subscribe for weekly episodes showing real-world craftsmanship, pro tips, and progress updates!
Follow us online:
Website: www.basementstructures.co.uk
Instagram: basement_structures
Facebook: Basement Structures Limited
#SuperBasement #BasementConstruction #CustomBasement #HomeRenovation #ConstructionSeries.
[Published: 20 May 2025]
Transcript
Welcome to YouTube. So, as a part of our Welcome to YouTube. So, as a part of our sort of social media works, we're trying sort of social media works, we're trying to document some of our projects and to document some of our projects and give you guys a bit of an understanding give you guys a bit of an understanding of of what we actually do while we dig of of what we actually do while we dig these holes in the garden for you and these holes in the garden for you and under your houses.
So, we're going to under your houses. So, we're going to try and document our project here in in try and document our project here in in Surrey. This is a bit of a sort of a Surrey.This is a bit of a sort of a super basement for us.
We don't tend to super basement for us. We don't tend to work on these sort of size projects. work on these sort of size projects.
They're very rare as they come through. They're very rare as they come through.So, we're quite fortunate and quite So, we're quite fortunate and quite lucky to be able to to crack on with lucky to be able to to crack on with this one. Um, as you can see, we've got this one.
Um, as you can see, we've got the boom pump in the background there. the boom pump in the background there. So, it's concrete paw day today.
So, it's concrete paw day today.Beautiful day for a concrete pour. Good Beautiful day for a concrete pour. Good conditions, not too hot, but not too conditions, not too hot, but not too cold.
Everything's working as is. The cold. Everything's working as is.The guys are just about finished up on guys are just about finished up on there.
But, um, as part of the project there. But, um, as part of the project as we started off here, hopefully we're as we started off here, hopefully we're going to put some little snippets in and going to put some little snippets in and some little bits of video of what we've some little bits of video of what we've got up with the setting out and things got up with the setting out and things like that as we go through and show you like that as we go through and show you the process from setting up on site, the process from setting up on site, having a go, first cup of tea, have a having a go, first cup of tea, have a look at what we're doing, marking out, look at what we're doing, marking out, setting out the job, and then we then setting out the job, and then we then start into the excavation works and start into the excavation works and things like that. So, lots of value things like that.
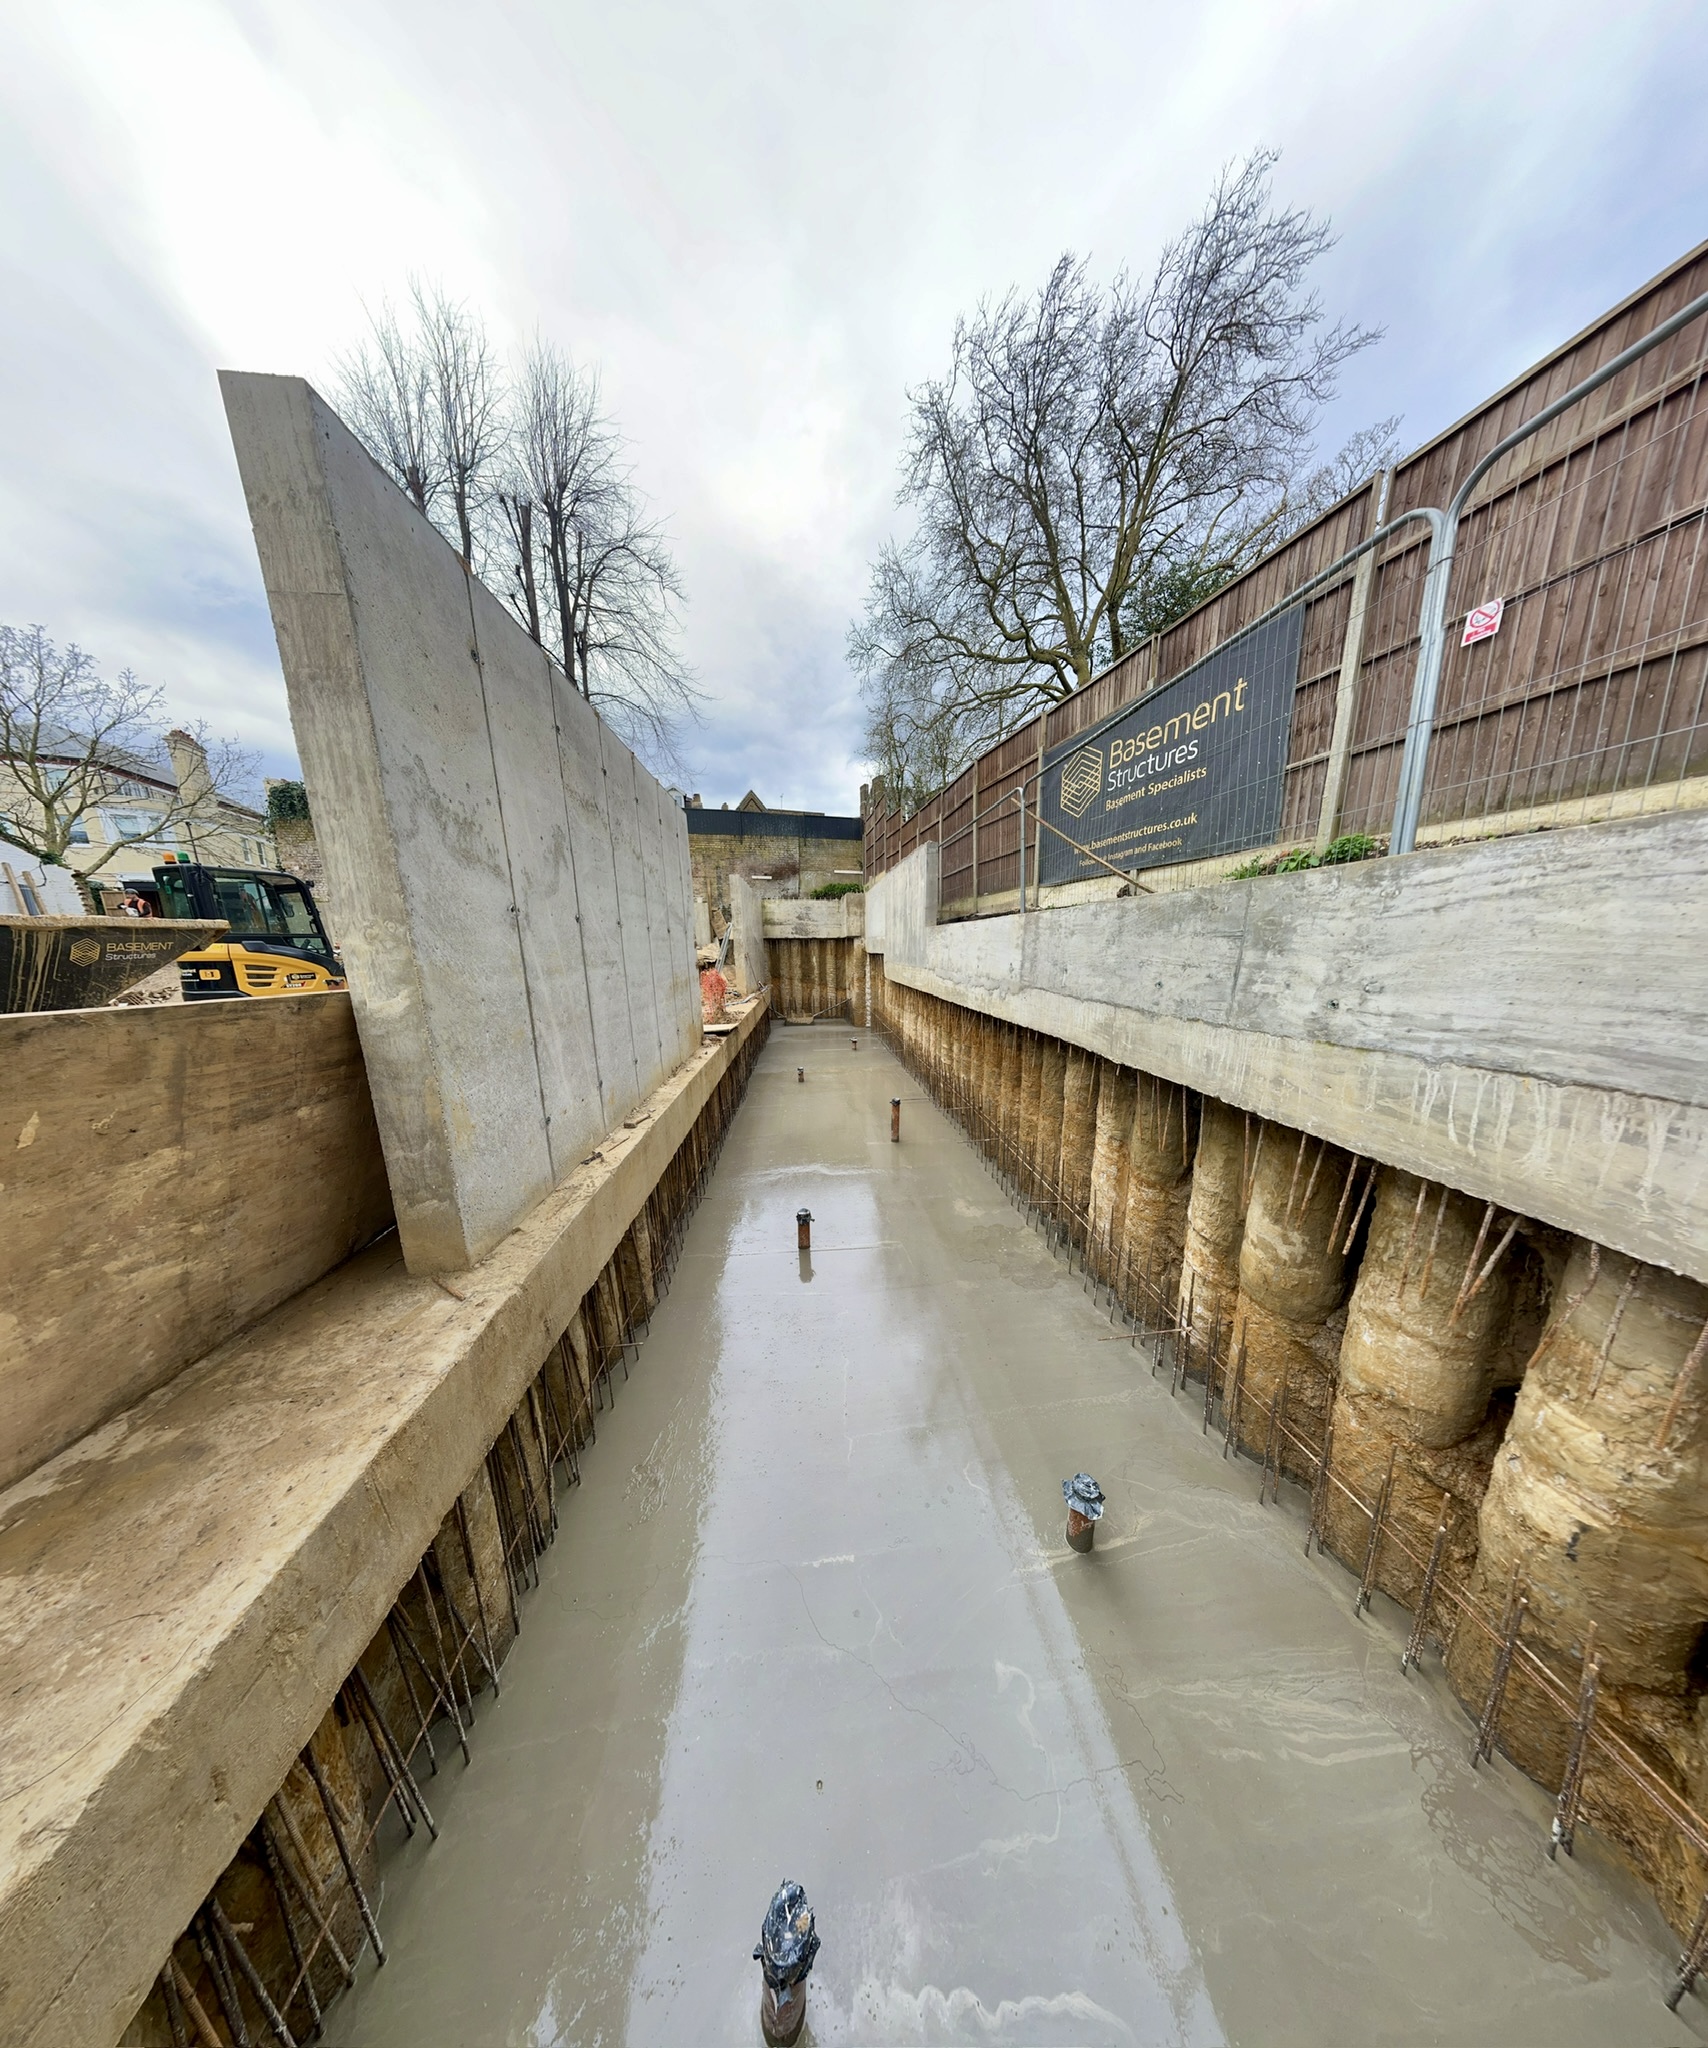
So, lots of value engineering we've been able to provide engineering we've been able to provide to the client here. Um, initial look at to the client here.Um, initial look at the drawings. They showed that we were the drawings.
They showed that we were we were piling the perimeter of this we were piling the perimeter of this project in order to support the ground project in order to support the ground before we excavated. We then suggested before we excavated. We then suggested and went back to the structural engineer and went back to the structural engineer that we could look at using an open that we could look at using an open cast, an open dig method, which is what cast, an open dig method, which is what we've carried out here.
So, we stepped we've carried out here.So, we stepped the excavation nice and wide at the top the excavation nice and wide at the top and work our way down in levels until we and work our way down in levels until we get to the formation level at the get to the formation level at the bottom. So again, plenty of photos and bottom. So again, plenty of photos and things like that hopefully going up to things like that hopefully going up to show you guys the process through that show you guys the process through that and how we've got on.
We'll put a couple and how we've got on. We'll put a couple more videos in of that a bit later on in more videos in of that a bit later on in the job. While the guys have finished the job.While the guys have finished down here, we'll let them crack on with down here, we'll let them crack on with the work.
And I'm going to stay up here the work. And I'm going to stay up here out the way. So, thank you for the out the way.
So, thank you for the vibration coming from the Volutric mixer vibration coming from the Volutric mixer over there. So, that just helps the the over there.So, that just helps the the cement and the sand from settling the cement and the sand from settling the hopper. So, we get a nice consistent mix hopper.
So, we get a nice consistent mix of the concrete as it gets poured of the concrete as it gets poured through and into the pump. We'll show through and into the pump. We'll show you some videos on concrete in later as you some videos on concrete in later as well, guys, don't worry.
So yeah, as we well, guys, don't worry.So yeah, as we were saying, bit of value engineering were saying, bit of value engineering going on down here. Um the open step going on down here. Um the open step excavation saves on the piling cost.
So excavation saves on the piling cost. So circa, you know, 100200,000 saving just circa, you know, 100200,000 saving just on this project alone just by meaning on this project alone just by meaning that we haven't got to have a piling that we haven't got to have a piling contractor come in and carry out the contractor come in and carry out the works. As part of that process as well, works.As part of that process as well, we also suggested that the material be we also suggested that the material be stockpiled on site.
So there's big heaps stockpiled on site. So there's big heaps of stock piles here at the moment. This of stock piles here at the moment.
This is all the material that we're digging is all the material that we're digging out from the job. This can be used out from the job.This can be used later, kept in the project, used for later, kept in the project, used for landscaping and tidying up and obviously landscaping and tidying up and obviously back fill around certain areas of uh of back fill around certain areas of uh of the walls and everything else that we're the walls and everything else that we're putting in. So, a bit about the putting in.
So, a bit about the structure. So, we have a retaining wall structure. So, we have a retaining wall structure around the perimeter of the structure around the perimeter of the whole basement.
So, phase one is whole basement.So, phase one is excavation. Phase two is to pour the excavation. Phase two is to pour the base for the retaining wall.
Again, base for the retaining wall. Again, plenty of snips going on of what you plenty of snips going on of what you guys will be uh seeing us get on with guys will be uh seeing us get on with it. Once the retaining wall base is it.Once the retaining wall base is poured, we'll then work on the wall poured, we'll then work on the wall sections themselves.
Pour the wall sections themselves. Pour the wall sections. So, we're effectively um sections.
So, we're effectively um creating a box um around the perimeter creating a box um around the perimeter of the basement. Then, that allows us to of the basement.Then, that allows us to work inside that box there, excavate the work inside that box there, excavate the middle, pour the roof slabs, and middle, pour the roof slabs, and everything else, giving the client the everything else, giving the client the basement for what they need. Yeah.
So, basement for what they need. Yeah. So, as we work through everything else that as we work through everything else that we're going on down here, as I've said we're going on down here, as I've said before, we're going to put loads of before, we're going to put loads of little videos together for you.
We're in little videos together for you.We're in the hole. This is a really good example the hole. This is a really good example actually of how the process is going to actually of how the process is going to going to work on this project.
So we can going to work on this project. So we can see the different phases that we've got see the different phases that we've got going on here. As we've said before in going on here.As we've said before in the previous videos, we're able to use the previous videos, we're able to use the stepped excavation which means we the stepped excavation which means we can bank the the dig as we work our way can bank the the dig as we work our way down taking all the weight off the edge down taking all the weight off the edge of the bank which will stop any material of the bank which will stop any material from sliding down and working into that.
from sliding down and working into that. Once we're finished with the excavation, Once we're finished with the excavation, we then move on to the blind. So this is we then move on to the blind.
So this is a 50 mil concrete blind laid through the a 50 mil concrete blind laid through the bottom. This is our level control. So bottom.This is our level control.
So this has to be checked and set with the this has to be checked and set with the laser that then gives us the exact level laser that then gives us the exact level for our formation which everything else for our formation which everything else is worked up and calculated from there. is worked up and calculated from there. So that's given to us by the structural So that's given to us by the structural engineer and then we use DATMSS within engineer and then we use DATMSS within the area to make sure that we're working the area to make sure that we're working to the correct the correct levels.
to the correct the correct levels.Moving on from the level once the blind Moving on from the level once the blind is poor we can see again moving around is poor we can see again moving around slightly we've got the reinforcement. So slightly we've got the reinforcement. So reinforcement cage being tied there.
reinforcement cage being tied there. This is the foundation for the retaining This is the foundation for the retaining wall. So, it's a 450 deep foundation wall.So, it's a 450 deep foundation which will then disappear up into a 200 which will then disappear up into a 200 mil thick slab through the rest of the mil thick slab through the rest of the basement.
So, as you can see, all the basement. So, as you can see, all the teal steel there nicely and neatly tied. teal steel there nicely and neatly tied.
Um, everything is set to a particular Um, everything is set to a particular schedule. Everything's tied to a schedule.Everything's tied to a particular code. 200 centers on the particular code.
200 centers on the bars, 16s and and 12 mils gone in there. bars, 16s and and 12 mils gone in there. After that, we've got the formwork.
So, After that, we've got the formwork.So, a very basic formwork here, just a a very basic formwork here, just a timber um stop end and a timber stop end timber um stop end and a timber stop end for the slab. This just allows the for the slab. This just allows the concrete to finish night nice neatly and concrete to finish night nice neatly and in a regimented way to allow us to in a regimented way to allow us to progress with the paw.
The reinforcement progress with the paw. The reinforcement obviously continuing path so we can tie obviously continuing path so we can tie it all together so it's one solid it all together so it's one solid structure when we're finished. Again, structure when we're finished.Again, beyond that, you can see the gray stuff beyond that, you can see the gray stuff in the middle.
So that's the concrete. in the middle. So that's the concrete.
That's what we've poured today. So the That's what we've poured today.So the concrete is poured to a level, compacted concrete is poured to a level, compacted and vibrated with the vibrating pokers, and vibrated with the vibrating pokers, double checked, and it's just a simple double checked, and it's just a simple TR finish over the top of that which TR finish over the top of that which allows us to to move on to the next bit, allows us to to move on to the next bit, the next phase. The next phase from here the next phase.
The next phase from here is the retaining wall. So the bars are is the retaining wall. So the bars are already in situ for that.
They're cast already in situ for that.They're cast into the bottom slab. We have the bars into the bottom slab. We have the bars that will run up.
We will then tie our that will run up. We will then tie our reinforcement cage to those bars. And reinforcement cage to those bars.And again, we'll put you another video again, we'll put you another video together of that showing you guys how we together of that showing you guys how we tie the walls up.
And then we'll move tie the walls up. And then we'll move forward into the wall formwork and forward into the wall formwork and things like that. But yeah, just a very things like that.
But yeah, just a very good example guys of of how we how we do good example guys of of how we how we do things, how we try and keep things nice things, how we try and keep things nice and safe for everybody and uh you know and safe for everybody and uh you know and how the project will develop. So and how the project will develop.So this phase will continue working our way this phase will continue working our way around the whole perimeter of the around the whole perimeter of the basement and then uh and then away we basement and then uh and then away we go. So yeah, welcome to the go.
So yeah, welcome to the hole. We had a good example over there hole. We had a good example over there of our different phases of work.
So this of our different phases of work.So this is sort of effectively phase one. This is sort of effectively phase one. This is the excavation stage.
Um we open up a is the excavation stage. Um we open up a nice wide dig, plenty of space here. So nice wide dig, plenty of space here.So we again we emitted the piling.
We don't we again we emitted the piling. We don't need to pile because we've got the room need to pile because we've got the room to step the dig. Once we've stepped the to step the dig.
Once we've stepped the dig down, we work down to our formation dig down, we work down to our formation level. We pull it through. um allowing level.We pull it through.
um allowing us to just throw the material to one us to just throw the material to one side out the way. It means we haven't side out the way. It means we haven't got to double handle any uh material or got to double handle any uh material or anything like that down here on the anything like that down here on the site.
We can stockpile it there, use it site.We can stockpile it there, use it at a later date. Once we've worked the at a later date. Once we've worked the dig out, you can see that we mark out as dig out, you can see that we mark out as we drop our different levels to make we drop our different levels to make sure that we're in the correct position sure that we're in the correct position for our foundation.
You'll have seen for our foundation. You'll have seen around the other side. The next phase around the other side.The next phase after that is we follow through with the after that is we follow through with the blinds.
And then after the blind, we blinds. And then after the blind, we then follow through with reinforcement, then follow through with reinforcement, formwork, and concrete. But yeah, this formwork, and concrete.
But yeah, this is the other side of the project from is the other side of the project from where we were looking at earlier on. Um, where we were looking at earlier on.Um, where our four phases were. We'll where our four phases were.
We'll continue this working round and then the continue this working round and then the other follow phases follow suit working other follow phases follow suit working around the property and then eventually around the property and then eventually we'll be ready to put the base and the we'll be ready to put the base and the slab in for the uh for the basement itself. So, we're at the bottom of one itself. So, we're at the bottom of one of the stock piles down here on our of the stock piles down here on our project in Surrey, our our super project in Surrey, our our super basement as we're calling it quite basement as we're calling it quite affectionately.
So again, as part of a affectionately.So again, as part of a cost-saving exercise for the client, cost-saving exercise for the client, we're able to store the material on we're able to store the material on site, which we mentioned in a previous site, which we mentioned in a previous video. You know, a bit of value video. You know, a bit of value engineering there for the guy.
And we're engineering there for the guy. And we're looking at utilizing this again um later looking at utilizing this again um later on in the project for landscaping. So we on in the project for landscaping.So we keep it here where we are.
Few little keep it here where we are. Few little tips that we just need to go. Again, as tips that we just need to go.
Again, as we stopping, we need to make sure it's we stopping, we need to make sure it's safe. We need to make sure it's secure safe.We need to make sure it's secure and it's not going to slip and slide and and it's not going to slip and slide and move around while we're working on it. move around while we're working on it.
So good compaction with the excavator So good compaction with the excavator while we're piling it up there. And while we're piling it up there. And again, we just make sure everything's again, we just make sure everything's neat and tidy and where it should be neat and tidy and where it should be rather than moving stuff around.
So, as rather than moving stuff around.So, as part of the excavation works on this part of the excavation works on this project in particular, we're moving project in particular, we're moving circa 3,000 tons of material. So, again, circa 3,000 tons of material. So, again, if you'd imagine if we had to take that if you'd imagine if we had to take that offsite, that's an awful lot of lorries offsite, that's an awful lot of lorries that would only potentially be able to that would only potentially be able to take 20 ton at a time.
That's a huge take 20 ton at a time. That's a huge saving for for the client. It's a huge saving for for the client.It's a huge saving and a time-saving exercise for us saving and a time-saving exercise for us as as a project lead.
It means that the as as a project lead. It means that the material can be moved a short distance material can be moved a short distance away and dealt with later and remanaged away and dealt with later and remanaged on the job. Environmentally as well, you on the job.
Environmentally as well, you imagine all the all the fuel we're imagine all the all the fuel we're saving for the lries in and out, the saving for the lries in and out, the environmental impacts for emissions and environmental impacts for emissions and things like that. So, it's an excellent things like that.So, it's an excellent box tick tick, excuse me, excellent box box tick tick, excuse me, excellent box ticking exercise for the um construction ticking exercise for the um construction phase plan and things like that for the phase plan and things like that for the planning application at the beginning of planning application at the beginning of any project. These are the things that any project.
These are the things that we tend to try and push on for a lot of we tend to try and push on for a lot of our projects where we can. We just save our projects where we can. We just save the client some money.
We're trying to the client some money.We're trying to think of the environmental impact of the think of the environmental impact of the works that we carry out and we try to works that we carry out and we try to minimalize the amount of impact on the minimalize the amount of impact on the local area of lorries in and out of the local area of lorries in and out of the job as well. So yeah, stockpile it here job as well. So yeah, stockpile it here on site, utilize it later, save on site, utilize it later, save everybody some time and everybody some everybody some time and everybody some money.
Talk you through the money. Talk you through the reinforcement, how that gets put reinforcement, how that gets put together, how it gets tied, how we together, how it gets tied, how we follow a certain drawing and a bar follow a certain drawing and a bar bending schedule to make sure that it's bending schedule to make sure that it's all installed correctly. We'll talk a all installed correctly.We'll talk a little bit about concrete as well, little bit about concrete as well, correct compaction, you know, make sure correct compaction, you know, make sure we have the right levels, check level we have the right levels, check level control, mix designs and things like control, mix designs and things like that to make sure that we're putting in that to make sure that we're putting in the right concrete that the structural the right concrete that the structural engineer has specified.
We'll talk you engineer has specified. We'll talk you through some of the formwork and false through some of the formwork and false work that we're putting. So, we use some work that we're putting.
So, we use some structures just require as basic timber structures just require as basic timber formwork. Others require something a formwork.Others require something a little bit more advanced. So, a little bit more advanced.
So, a proprietary system like a panel system proprietary system like a panel system with struts and braces. That's all with struts and braces. That's all happening down here.
So, as we progress happening down here.So, as we progress through the project, we'll put some through the project, we'll put some stuff together for you and we'll show stuff together for you and we'll show you from day one to hopefully finish of you from day one to hopefully finish of of what we get up to. It just be a nice of what we get up to. It just be a nice bit of insight, we think, for everybody bit of insight, we think, for everybody to see what goes on at Basement to see what goes on at Basement Structure.
There's a lot of stigma about Structure. There's a lot of stigma about what we do. It's normally hidden behind what we do.It's normally hidden behind hoarding, so nobody really gets the hoarding, so nobody really gets the opportunity to have a little de dive opportunity to have a little de dive inside and uh and see what happens on a inside and uh and see what happens on a on a basement project.
So, all being on a basement project. So, all being well, we'll uh keep you up to date. well, we'll uh keep you up to date.
We'll make some more videos and we'll We'll make some more videos and we'll see you soon. Cheers.